How to Connect a DVD Player to a TV: 4 Cable Options and Fixes

Summary: Match the output on your DVD player to the input on your TV, then use HDMI, composite RCA, component video, or a powered converter. This guide provides a port matrix, four numbered setup paths, focused no-signal and no-sound diagnostics, and a short Windows playback alternative.
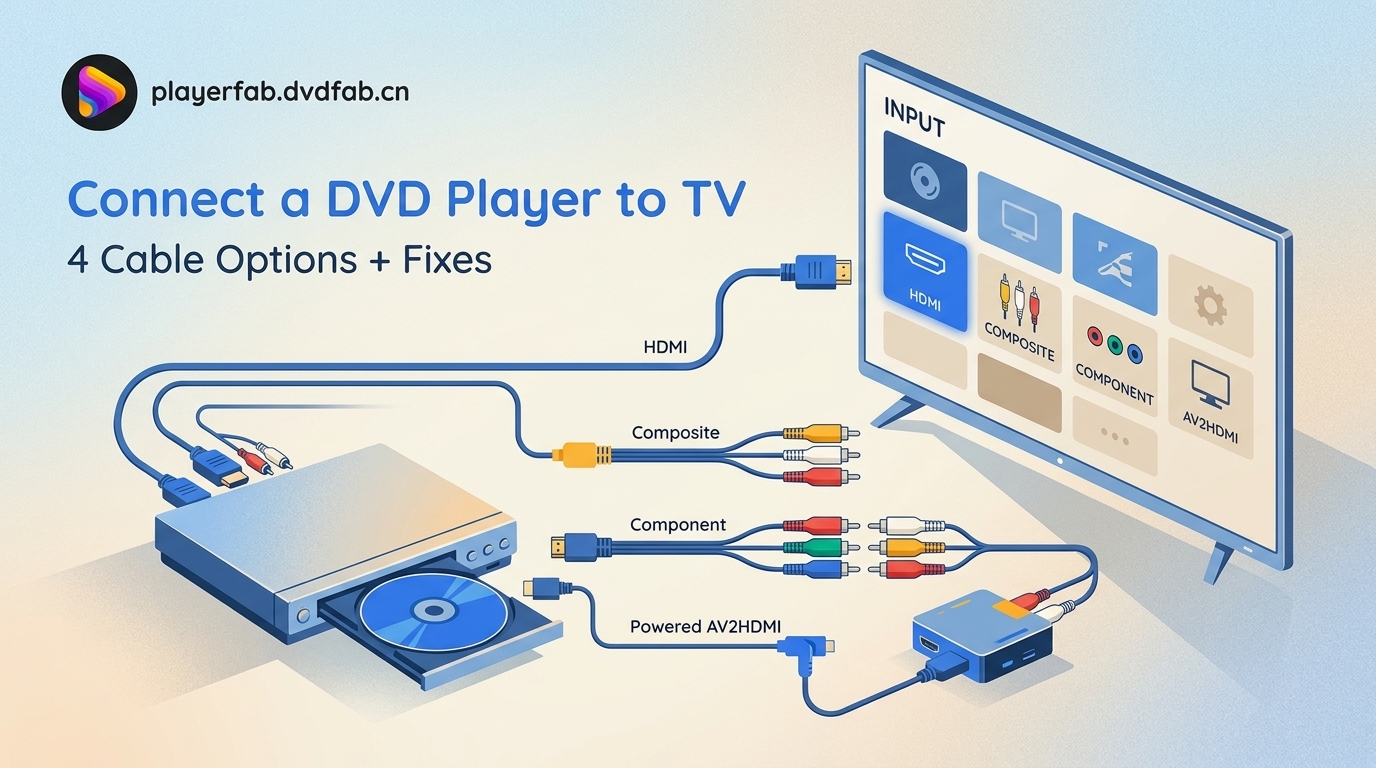
Trying to connect a DVD player to a TV becomes confusing when the ports do not match or the screen stays blank. The reliable route is to identify each labeled output and input, choose one of four connection methods, then troubleshoot the signal path one variable at a time.
Use this four-step quick answer:
- Match the labeled output on the DVD player to a compatible input on the TV.
- Connect the correct cable, or add a powered converter when analog output must feed an HDMI input.
- Power on the DVD player, TV, and converter if one is present.
- Select the TV input channel that matches the port you used.
Check Your Ports Before Connecting
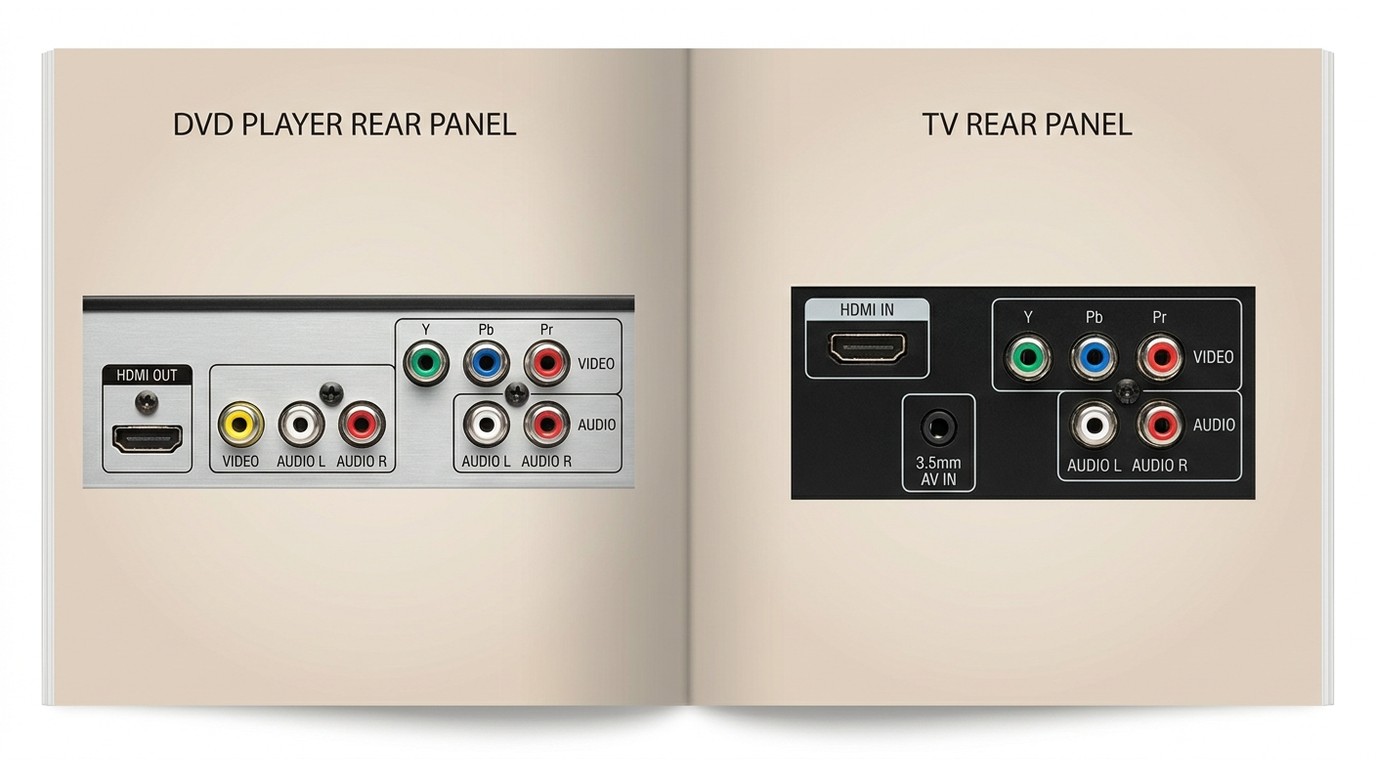
Read the port labels before matching colors. HDMI, composite AV, component YPbPr, and manufacturer-specific 3.5 mm AV inputs can look similar enough to cause a wrong connection, especially on a TV that shares jacks between signal types.
My practical rule is simple: trust labels such as HDMI OUT, VIDEO OUT, YPbPr, and AV IN before trusting plug color. The same RCA connector shape can carry different signals, so a physically fitting plug is not proof of compatibility.
Back-panel label map:
- HDMI OUT on the player → HDMI IN on the TV: one flat cable carries picture and sound.
- VIDEO OUT plus AUDIO L/R → AV IN: yellow carries composite video; white and red carry left and right audio.
- Y/Pb/Pr plus AUDIO L/R → COMPONENT IN: green, blue, and red carry video; a separate white-and-red pair carries sound.
- 3.5 mm AV IN on the TV: use the breakout cable specified for that TV model because pin assignments are not universal.
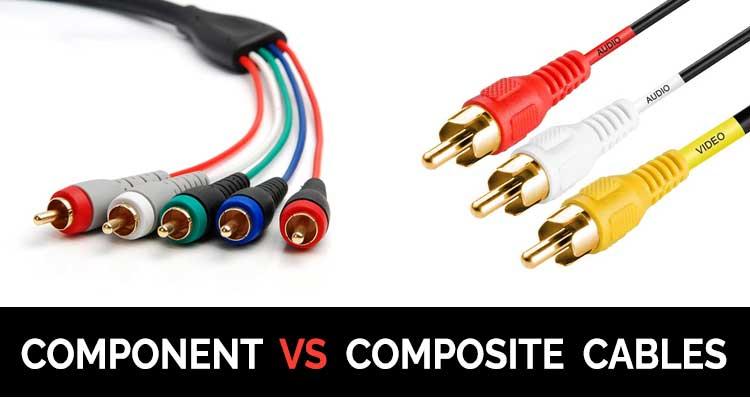
The labeled component plugs above also show why the two red connectors must not be confused: one red plug is Pr video, while the other is right-channel audio.
Choose the Right Connection
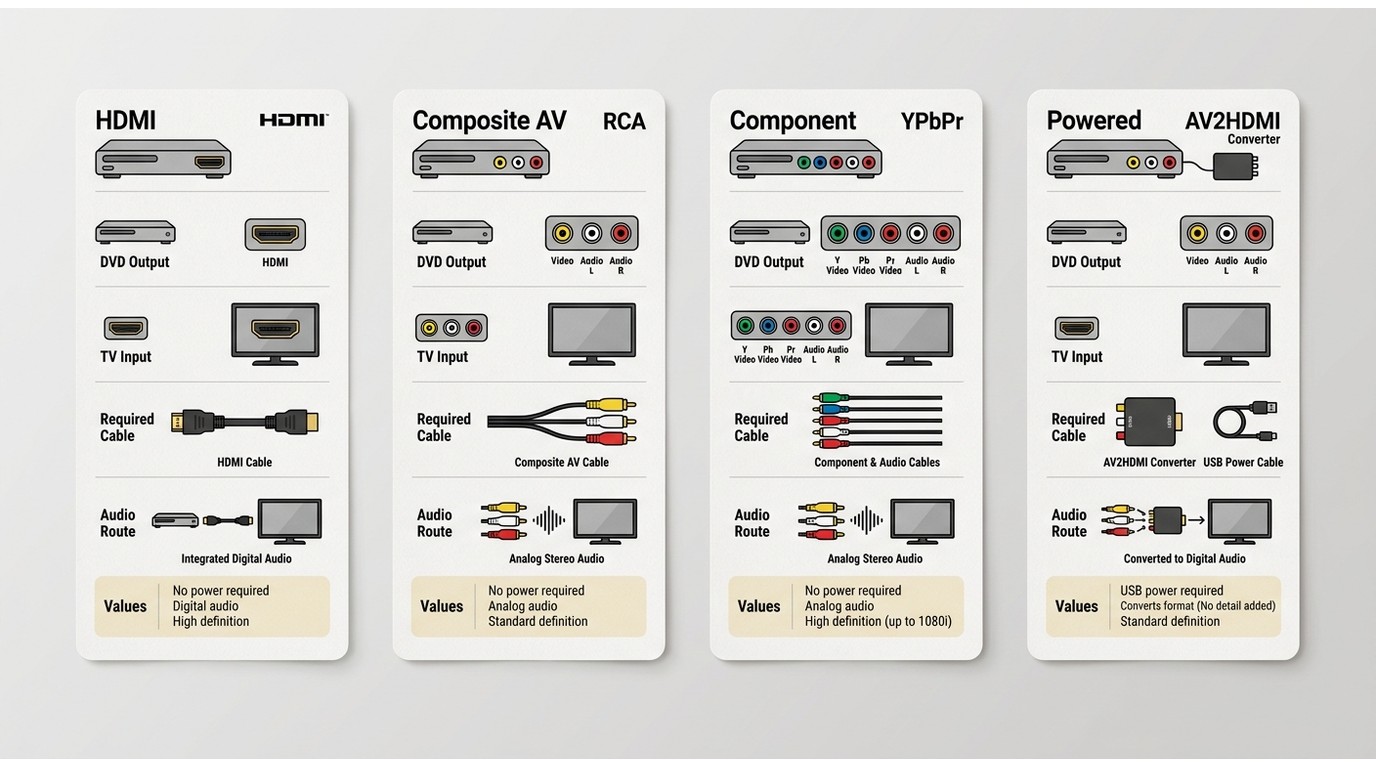
Choose HDMI when both devices support it. Use composite or component only when the TV has the matching analog input; for an analog-output player and an HDMI-input TV, use a powered RCA to HDMI converter in the correct AV-to-HDMI direction.
| Connection | DVD player output | TV input | Cable or adapter | External power required | Audio path | Expected picture quality | TV source label |
|---|---|---|---|---|---|---|---|
| HDMI to HDMI | HDMI OUT | HDMI IN | HDMI cable | No | Audio travels through HDMI | Cleanest digital connection supported by both devices | HDMI 1, HDMI 2, or the numbered port used |
| Composite RCA to AV input | Yellow VIDEO OUT plus white/red AUDIO OUT | Composite AV IN | Yellow, white, and red composite cable | No | White/red analog audio pair | Standard-definition source with a softer image | AV, Video, AV1, or AV2 |
| Component YPbPr plus RCA audio | Y/Pb/Pr plus AUDIO OUT | COMPONENT IN plus AUDIO IN | Three component video plugs plus two audio plugs | No | Separate white/red analog audio pair | Can support progressive or higher-resolution output when the equipment and settings allow it | Component or YPbPr |
| Composite AV through a powered RCA-to-HDMI converter | Composite VIDEO OUT plus AUDIO OUT | HDMI IN | Composite cable, AV-to-HDMI converter, and HDMI cable | Yes, normally by USB | Analog audio enters the converter and exits through HDMI | Converted to HDMI format without adding detail to the analog source | The HDMI port connected to the converter |
The practical takeaway is that HDMI is the simplest fit when available. A powered converter is the sensible bridge for an analog-only player and an HDMI-only TV, but it changes the signal format rather than upgrading the source image.
Connect the DVD Player to Your TV
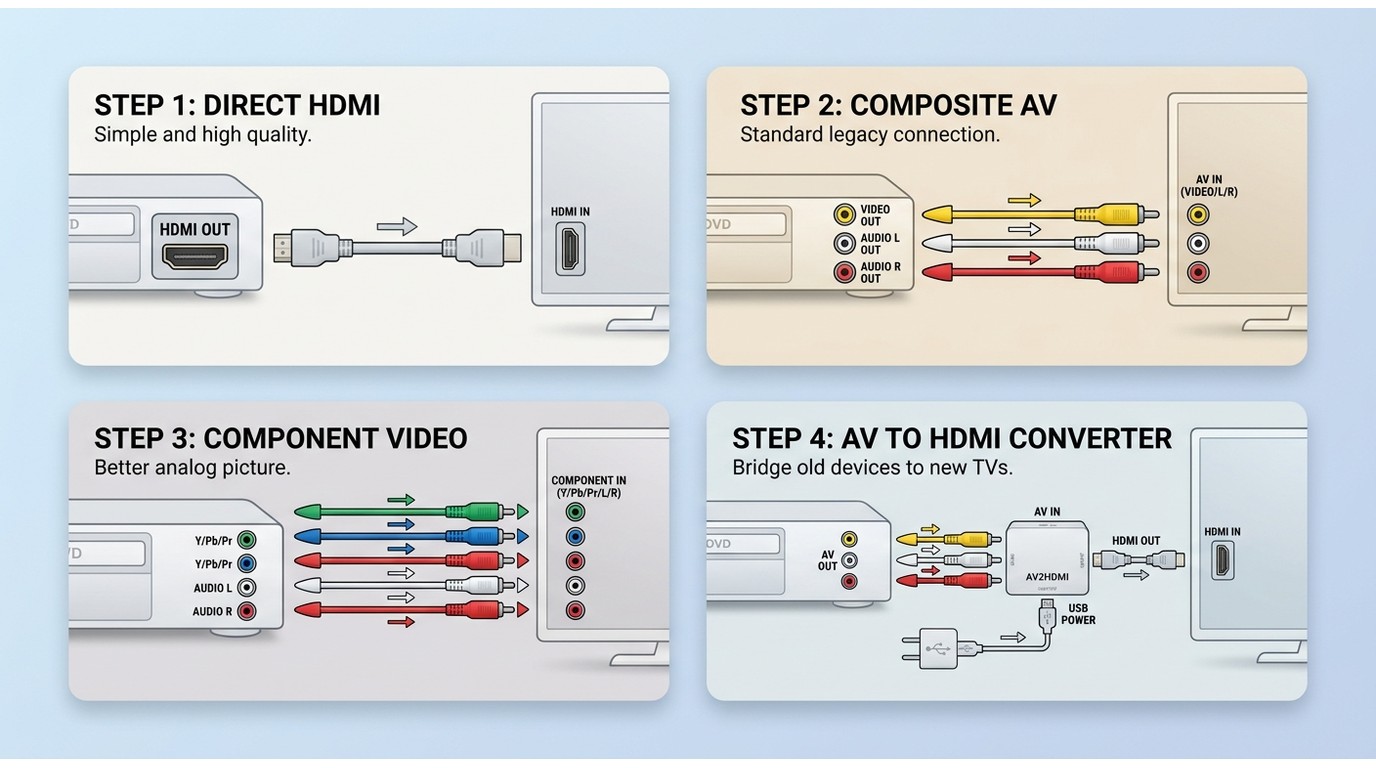
Connect from an output on the DVD player to an input on the TV, then select the matching DVD player input channel on the television. Keep HDMI first in your decision order because it uses one cable for both picture and sound.
Option 1: HDMI Connection
A DVD player HDMI connection is the cleanest setup when both devices have HDMI. It suits readers who want one cable and straightforward input selection; it is not useful when the older player has analog outputs only.
What you need: one HDMI cable.
- Connect one end of the cable to HDMI OUT on the DVD player.
- Connect the other end to an HDMI IN port on the TV and note its number.
- Turn on both devices.
- Press Source or Input on the TV remote and select that HDMI port.
- Insert a disc and wait for the player menu to appear.
If the picture appears without sound, open the player's audio settings and confirm that audio is routed through HDMI. Try PCM or two-channel output if the TV cannot decode the selected format, check any receiver or soundbar routing, then test another HDMI port or cable.
Perfect video does not rule out an audio-format or HDMI handshake problem. Treat picture and sound as separate checks instead of reconnecting the entire setup at once.
Option 2: Composite RCA Connection
Composite suits an old player and a TV with a dedicated AV input. It is adequate for occasional DVD viewing, but not ideal when image sharpness matters because the yellow video lead carries a standard-definition analog signal.
What you need: a yellow, white, and red composite AV cable.
- Connect yellow to VIDEO OUT on the DVD player.
- Connect white to AUDIO OUT L and red to AUDIO OUT R.
- Connect the three plugs to the corresponding composite inputs on the TV or its model-specific AV breakout cable.
- Select AV, Video, AV1, or the label assigned to that input.
- Turn on the player and insert a disc.
If the TV uses a shared green jack for composite video, follow the TV label or manual rather than assuming any green component socket will accept the yellow composite signal.
Option 3: Component Video Connection
Component suits equipment with matching YPbPr inputs and can provide a cleaner analog picture than composite. Available resolution depends on the DVD player, TV, disc, and output settings, so it should not be treated as a blanket high-definition guarantee.
What you need: green, blue, and red component video leads plus white and red audio leads.
- Connect green Y, blue Pb, and red Pr from the player's component output to the matching TV input.
- Connect the separate white and red audio plugs to the paired audio input.
- Check the labels carefully so the red Pr video lead is not placed in the red audio jack.
- Select Component or YPbPr on the TV.
- Turn on the player, insert a disc, and adjust the player's video-output setting only if the picture is missing or distorted.

Component is a useful legacy option, but the viewing result is still bounded by the disc and both devices. A converter or cable cannot create detail that the original DVD signal does not contain.
Option 4: RCA-to-HDMI Converter
An RCA-to-HDMI converter suits an analog-output player and an HDMI-input smart TV. It is not ideal for anyone expecting an HD-quality upgrade, because conversion changes the connection format without restoring detail absent from the source.
What you need: a composite AV cable, an AV-to-HDMI converter, an HDMI cable, and USB power for the converter.
- Connect yellow, white, and red from the DVD player's AV OUT ports to the converter's AV INPUT.
- Connect HDMI from the converter's HDMI OUTPUT to an HDMI input on the TV.
- Connect the converter's USB power lead to a suitable powered USB source.
- If the box includes 720p/1080p or PAL/NTSC switches, start with the setting appropriate for the TV and disc format.
- Select the connected HDMI input on the TV, then turn on the DVD player.
Direction matters: a box labeled HDMI-to-AV performs the reverse job and will not carry a DVD player's analog output into the TV. If the image is stretched, cropped, or unstable, check the converter switch and the TV's aspect-ratio setting before replacing the player.
Fix No Signal, No Picture, or No Sound
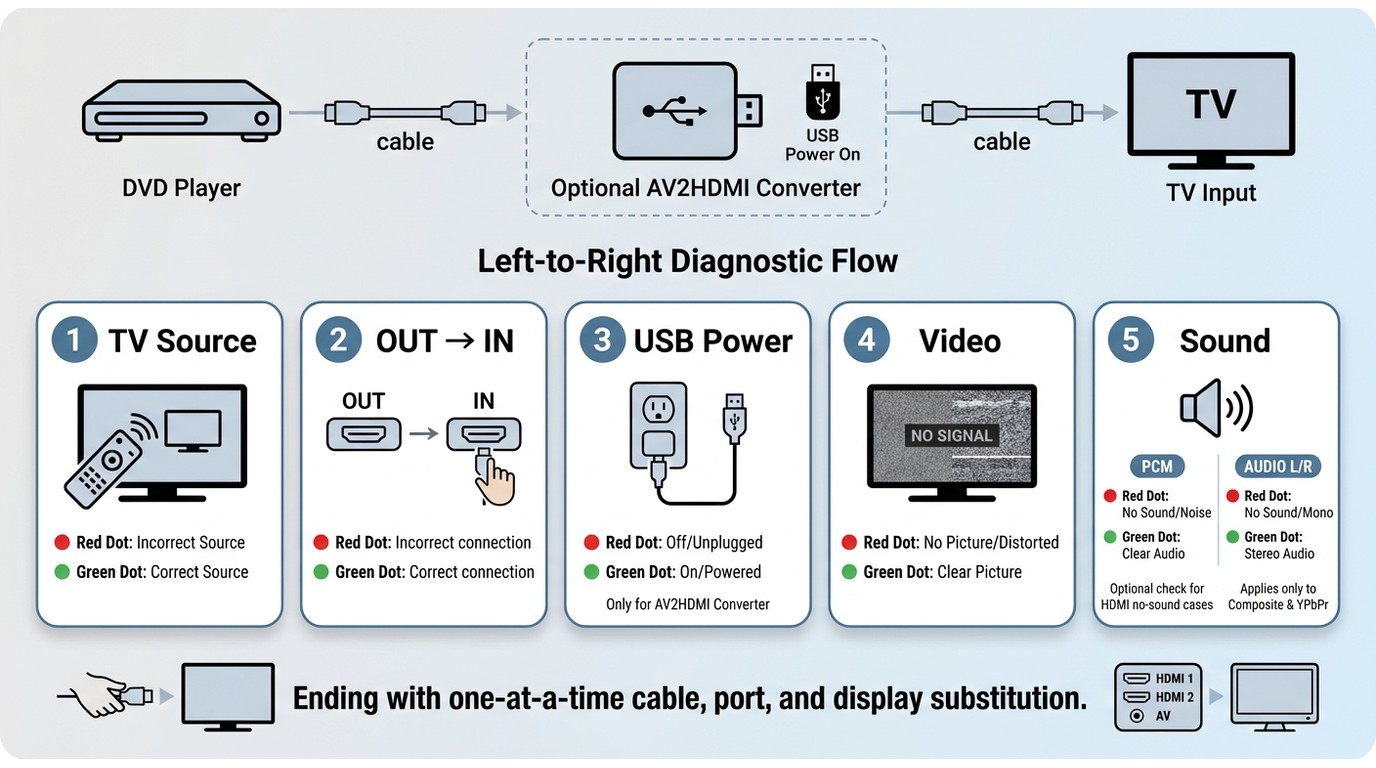
When the TV shows no signal, trace the path in order: source selection, OUT-to-IN direction, converter power, port compatibility, audio settings, then cable and device substitutions. This sequence finds the failed link without changing several variables at once.
- Select the exact TV source that matches the connected port.
- Confirm that the cable leaves an OUT port and enters an IN port.
- Power any active converter and confirm its direction and switch settings.
- Check shared AV/component jacks and model-specific 3.5 mm breakout cables.
- If video works, diagnose sound separately.
- Substitute one cable, TV input, or display at a time.
I favor one-variable-at-a-time troubleshooting because repeatedly unplugging everything can hide the original fault. A disciplined signal-chain check is slower for the first minute and much faster by the end.
Converter Shows No Signal
A converter no-signal problem usually starts with direction or power. Confirm that analog AV enters the converter, HDMI leaves it, and the USB power connection is active before changing resolution or television settings.
- Read the casing for AV2HDMI or equivalent input/output labels.
- Try a different powered USB source if the converter light is off or the picture drops in and out.
- Toggle an included 720p/1080p or PAL/NTSC switch, then allow the TV a moment to renegotiate the signal.
- Select the numbered HDMI input that physically receives the converter cable.
Picture Appears Without Sound
DVD player no sound issues depend on the connection type. HDMI problems often involve audio format, routing, port, cable, or handshake behavior; composite and component setups usually fail because the white/red audio pair is loose, crossed, or connected to another input group.
- For HDMI, select HDMI audio output and try PCM or two-channel sound.
- If a receiver or soundbar is in the path, confirm that it uses the same HDMI source.
- For analog connections, reseat both audio plugs and verify that they belong to the same input group as the video connection.
- Test the TV speakers directly to separate player settings from external-audio routing.
Isolate the Player, TV, and Cable
If labels, source selection, and settings are correct, isolate the hardware. Test the DVD player on another display, connect another device to the same TV input, or replace one cable at a time.
The result identifies the weak link: a player that fails on two displays points back to the player, while several devices failing on one input point to the TV port. A problem that follows one cable identifies the simplest replacement.
Play DVDs on a Windows PC
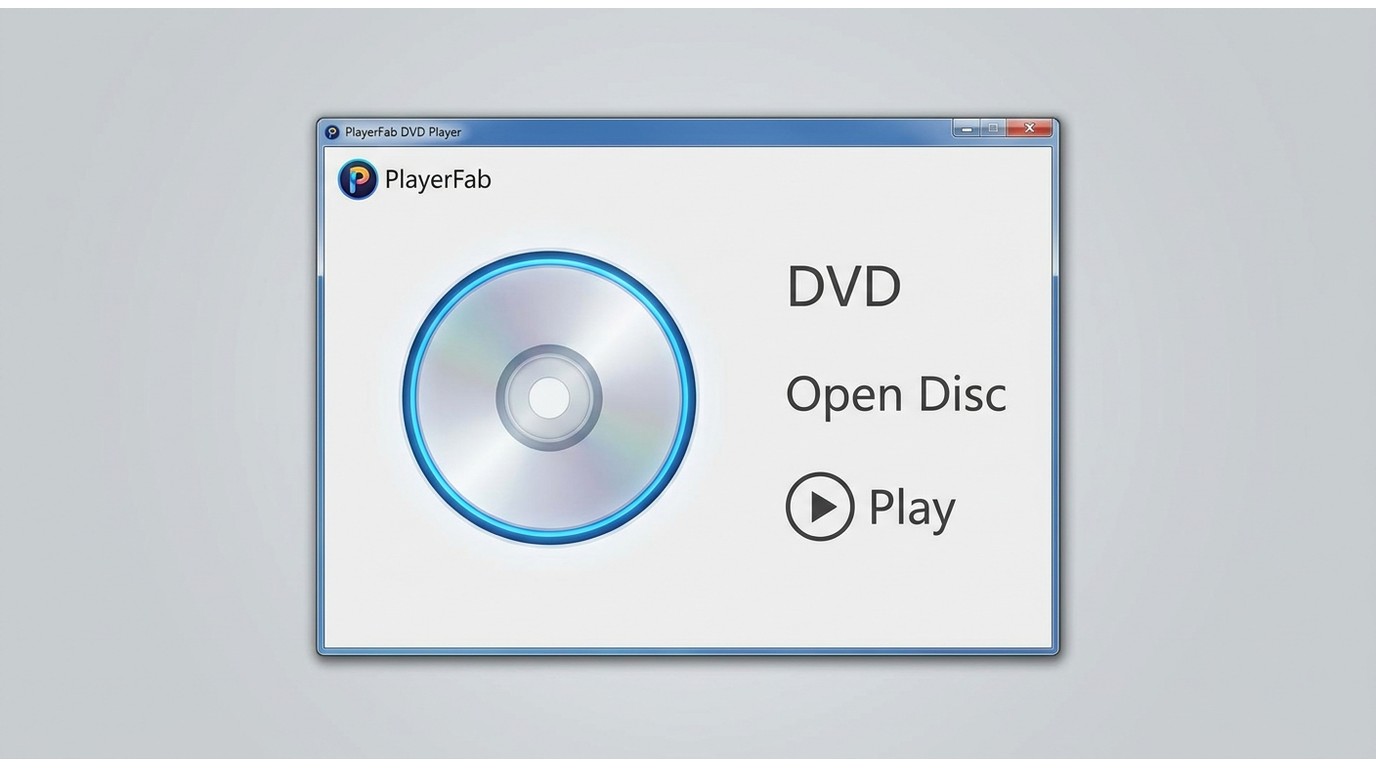
A Windows PC with an optical drive is a separate playback path for readers who no longer want to use a hardware player. It does not connect a standalone DVD player to a TV, and it should not be treated as a fix for a television cabling problem.
If the task has shifted to how to play DVDs on Windows 10, computer playback keeps the disc, drive, software, and display in one signal path. For legally owned discs used personally and under applicable terms, guidance on how to play Region 2 DVDs in the US belongs with the region-specific setup rather than the TV connection steps above.
Use PlayerFab for Disc Playback
PlayerFab DVD Player is suitable for a Windows PC with an optical drive when disc-menu playback is needed. It is computer playback software, not a cable, converter, or method for linking a standalone DVD deck to a television.
Keep this alternative brief: install the software, insert a legally owned DVD, open the disc, and use the on-screen menu. It fits a PC viewing workflow; it is less suitable if the goal is to keep using the television and existing hardware player.
Frequently Asked Questions
These quick answers cover connection Edge cases that are easy to miss when the main cable path is already understood.
What if my TV uses a 3.5 mm AV input?
Use the breakout cable specified for that TV model. A 3.5 mm plug can carry composite video and stereo audio, but manufacturers do not use one universal pin assignment, so a physically compatible adapter may still produce no picture, swapped audio, or a distorted signal.
Does a DVD recorder use the same TV connection?
A DVD recorder TV connection for playback usually follows the same HDMI, composite, or component output path as a standard player. Recording from a broadcast tuner or another source may require additional input, antenna, or tuner connections defined by the recorder, which is a different task from sending playback to the TV.
Can I connect a DVD player wirelessly or through USB?
Standard DVD players normally send video through HDMI or analog AV outputs. A TV's USB port is generally for power, media files, or service functions rather than direct DVD-player video. Wireless use requires separate transmitter hardware or a different playback workflow, and it can add delay or compatibility issues.
Are all DVD players compatible with smart TVs?
DVD player smart TV compatibility depends on ports, not smart features. HDMI can connect directly when both devices have it. An analog-output player can work with an HDMI-input TV through the correct powered AV-to-HDMI converter, provided the converter direction, power, and TV source are correct.
Why does an AV-to-HDMI converter need USB power?
The converter actively translates an analog video-and-audio signal into HDMI, so it needs electricity to process and output that signal. An unpowered or underpowered box may show no signal, drop the picture, or behave inconsistently even when every cable is in the correct port.

![Play DVDs on Windows 10/11: 4 Methods and Fixes [2026]](https://r4.dvdfab.cn/upload/player/en/how-to-play-dvds-on-windows-10-BykI.jpg) Play DVDs on Windows 10/11: 4 Methods and Fixes [2026]By Alice Harper - Jul 29, 2026
Play DVDs on Windows 10/11: 4 Methods and Fixes [2026]By Alice Harper - Jul 29, 2026 8 Best DVD Players for Windows 10/11 (Free and Paid, 2026)By Alice Harper - Jul 29, 2026
 How to Play a DVD on a Laptop: 3 Methods That WorkBy Alice Harper - Jul 29, 2026
 How to Play VOB Files: VLC, DVD Menus, and MP4 ConversionBy Alice Harper - Jul 23, 2026